The USA B1/B2 visa application process from India has nine clear steps: choose your visa type, complete the DS-160, pay the fee, book appointments, organise documents, prepare for the interview and handle the result. This guide explains each one in plain language.
The USA B1/B2 visa application process looks simple on paper, but it trips up many first-time applicants. A small mistake on the DS-160, a missed appointment or a weak set of documents can cost you weeks and a visa fee that is not refunded. Knowing the order of the steps removes most of that stress.
At India Service Desk, we help applicants across India prepare for the USA B1/B2 visa application process, and the steps below are the ones we walk clients through. Fees, appointment systems and interview rules change often, so always confirm current details on the official US government website before you pay or book.
In this guide: 1. Visa type · 2. Passport · 3. DS-160 · 4. Fee · 5. Appointments · 6. Documents · 7. Preparation · 8. Interview · 9. Result
Why the USA B1/B2 Visa Application Process Confuses So Many Applicants
Most applicants are unsure about the order of tasks. Some book an appointment before the DS-160 is ready, others pay the fee for the wrong visa type, and many walk into the interview carrying a thick file but no clear story. The USA B1/B2 visa application process is really two things: administrative steps you can complete at home, and a short interview where you must show a genuine purpose of travel and strong ties to India.
Treat the first part as a checklist and the second part as a conversation. Do both well, and you give yourself the best realistic chance.
The USA B1/B2 Visa Application Process at a Glance
DS-160 Form
Complete the online application and keep the confirmation page
Fee and Account
Create your profile and pay the visa fee
Appointments
Book the slots shown on the official website
Documents
Organise ID, finance and ties-to-India proof
Interview
Answer briefly, honestly and consistently
Result
Approval, refusal or extra administrative processing
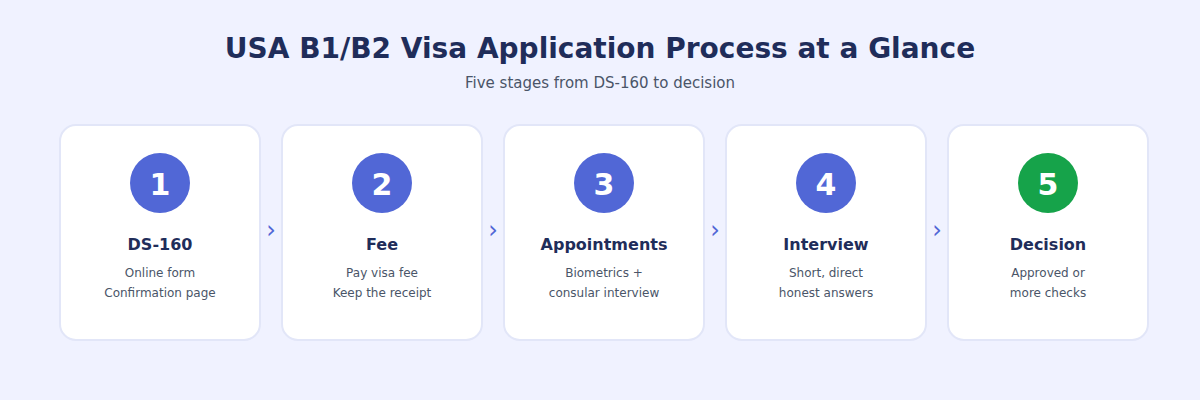
The USA B1/B2 visa application process moves from DS-160 to fee, appointments, interview and decision.
Step 1: Choose Between B1, B2 or the Combined B1/B2
B1 is for business visits such as meetings, conferences and negotiations. B2 is for tourism, family visits and medical treatment. Neither allows you to work or earn a salary in the USA. Most Indian applicants apply for the combined B1/B2, which covers both purposes. Be clear about your main reason for travel, because every later answer must match it.
Step 2: Check Your Passport and Photo
Your passport must be valid for your planned stay and have blank pages. If you have older passports, keep them, since the officer may ask about earlier travel. For the DS-160 you also need a recent digital photo that meets the official requirements. A rejected photo causes avoidable delays, so follow the photo rules on the official site carefully.
Step 3: Complete the DS-160 Form Online
The DS-160 is the online non-immigrant visa application. You fill it on the official CEAC website. It asks about your travel plans, work, family, previous travel and security questions. Answer honestly and consistently, because the officer compares your interview answers with this form.
- Write your name and passport details exactly as in your passport
- Save your Application ID so you can return to a draft
- Review every page before submitting, since a submitted form cannot be edited
- Print the confirmation page with the barcode and keep it safe
Step 4: Create Your Account and Pay the Visa Fee
Next, create a profile on the official US visa appointment website for India, which is linked from the US Department of State visitor visa page. Enter your DS-160 details and pay the visa application fee. The fee is not refunded if your visa is refused, and it is usually valid for a limited period. Keep the receipt, because you will need it at the interview.
Step 5: Book Your Appointments
In India, the USA B1/B2 visa application process usually involves a biometrics visit and a consular interview. Your confirmation will show the exact locations, dates and times. Choose dates when you can attend without rushing, and avoid last-minute bookings if you have a travel date. Appointment waiting times differ by city and season, so check early. Applicants from Hyderabad should follow the location shown on their own confirmation.
Please note: interview waiver rules, drop-box eligibility and appointment procedures have changed several times. Always confirm whether you need an interview on the official website instead of relying on older articles.
Step 6: Organise Your Documents
Officers often ask for few or no papers, but you must be ready. Your documents should prove two things: a genuine reason for travel and strong reasons to return to India. Our full list is on the USA B1/B2 visa documents page.
- Passport, old passports and the DS-160 confirmation page
- Appointment confirmation and visa fee receipt
- Employer letter, salary slips or business registration proof
- Bank statements for the last 6 months and your latest ITR
- Property, investment and family proof showing ties to India
- Invitation letter if you are visiting family or a business host
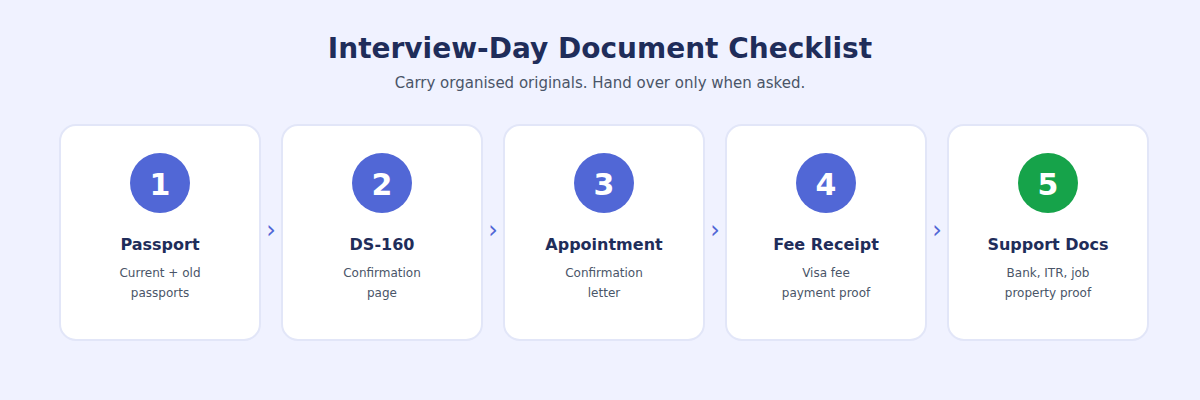
Carry organised originals, and hand over documents only when the officer asks.
Step 7: Prepare for the Visa Interview
The interview is short, so your answers must be clear. Practise saying why you are travelling, how long you will stay, who is paying and why you will return. Expect questions like these:
- What is the purpose of your trip, and where will you stay?
- What do you do for work, and what is your income?
- Who is funding the trip?
- Do you have family or property in India?
- Have you travelled abroad or been refused a visa before?
Do not memorise scripts. Officers can spot rehearsed answers, and a natural, honest reply works better. If you want a mock session, our visa services for Indians include interview preparation.
Want Your Application Checked Before the Interview?
WhatsApp us your travel purpose and profile. We will review your DS-160 answers and documents and tell you what to fix. The decision always rests with the US consular officer.
💬 WhatsApp +91 90143 56743Step 8: Attend the Interview
Arrive early with your documents organised in one folder. Security rules at consulates are strict, so check the official instructions about what you may bring, since phones, bags and electronics are often restricted. Greet the officer politely, answer exactly what is asked, and keep answers short. If you do not understand a question, ask for it to be repeated. Never give false information, because a misrepresentation can lead to serious long-term problems.
Step 9: Understand the Result and Next Steps
At the end, the officer will tell you whether your application is approved, refused or needs more checks. If approved, your passport with the visa is usually returned by courier. If the officer needs more information, you may be given a request for extra documents or placed in administrative processing, which can take longer.
The most common refusal reason is failing to show strong ties to India. If refused, do not rush to reapply with the same facts. Understand what the officer said, and apply again only when your situation or documents have genuinely improved.
Common Mistakes in the USA B1/B2 Visa Application Process
Most refusals and delays come from a handful of avoidable errors. Check this list before you submit anything:
- Rushing the DS-160 and giving answers that later contradict your interview
- Showing large, unexplained bank deposits just before the appointment
- Applying with a vague purpose, dates or host details
- Carrying a huge file and handing over papers nobody asked for
- Relying on outdated rules from old blogs or social media posts
Avoiding these mistakes will not guarantee approval, but it keeps your USA B1/B2 visa application process clean, consistent and easy for the officer to understand.
USA B1/B2 Visa Application Process: Frequently Asked Questions
How long does the USA B1/B2 visa application process take?
Filling the DS-160 and paying the fee takes a day or two. The main delay is the appointment wait, which changes by city and season. After a successful interview, passports are usually returned within a few working days, but administrative processing can take longer.
Can I edit the DS-160 after submitting it?
No. A submitted DS-160 cannot be edited. If you find an error, you generally need to complete a new DS-160, so review every answer before submitting.
Is the visa fee refundable if my visa is refused?
No. The visa application fee is not refunded if the visa is refused, so prepare carefully before you apply.
What documents do I carry to the B1/B2 interview?
Carry your passport, DS-160 confirmation page, appointment confirmation, fee receipt and organised supporting documents such as bank statements, ITR, employment proof and property papers. The officer may ask for few or none of them.
Do I need an agent to apply for a B1/B2 visa?
No. You can apply yourself on the official US government websites. Many applicants take help with document preparation and interview practice, and the decision is always made by the US consular officer.
Final Thoughts on the USA B1/B2 Visa Application Process
The USA B1/B2 visa application process becomes manageable when you take it one step at a time: an accurate DS-160, organised documents, honest answers and a calm interview. Start with the DS-160 this week, and build the rest around your appointment date.
If you want a second pair of eyes, read about our USA B1/B2 visa assistance for Indians or message us on WhatsApp.
Note: India Service Desk provides document preparation and guidance. We are not affiliated with the US government and cannot guarantee visa approval. Always verify current fees and rules on official US government websites.
Get Your B1/B2 Application Ready With Confidence
Message us on WhatsApp for a document checklist, DS-160 guidance and interview preparation.
+91 90143 56743 · myindiaservicedesk@gmail.com · Hyderabad, Telangana